
Let's dive right in and talk about THESE:
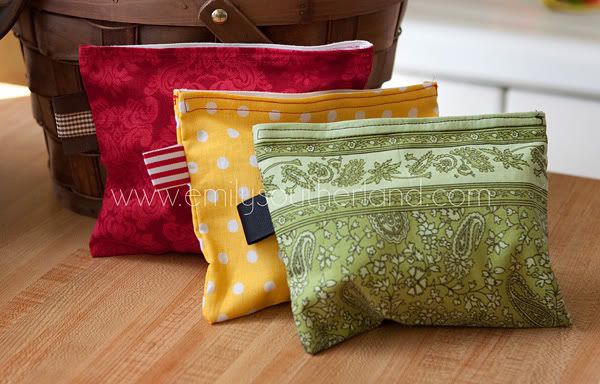
CUTE, right?!? I LOVE these. Reusable Snack Bags. I saw these for the first time this September when I was in California doing photos. Jennie had some in her diaper bag, and I SWOONED. I made her talk to me about them for MUCH longer than what was probably polite, but she humored me, and I was satiated. She had gotten them on Etsy, she said, and there were several versions from several artists. I vowed then and there to look them up and try a few of my own.
When I got home from my trip, she emailed me a link to a blog that had a tutorial. How sweet of her, really! I was EXCITED and after obtaining some unbleached muslin, I started trying these things out. They turned out to be SUPER easy, REALLY satisfying, and honestly, they make the cutest little gift to give someone, just because.
Here, based on ReproDepot's Tutorial, with a few additions of my own, the Reusable Snack Bag-- the perfect GREEN way to tote around Goldfish crackers, raisins, pretzels, Cheerios, Yo-Gos, and pretty much anything else you want, except maybe applesauce.
Materials:
Cute cotton outer fabric
Unbleached muslin for the lining
NON-STICKY Velcro
Thread
Ribbon/felt/fleece if you want
Step One:
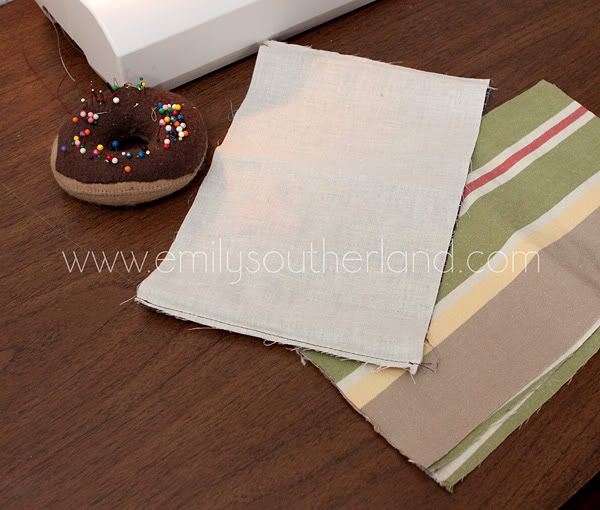
Cut the fabrics. You want about 7"x12", but this can be altered based on your needs or on your fabric stash. Just make sure that the muslin and the cute fabric are the same size.
Place the two pieces with the right side in, and stitch along the shorter sides, both sides, about a 1/4" to 1/2" seam.
Optional PRE-Step One:
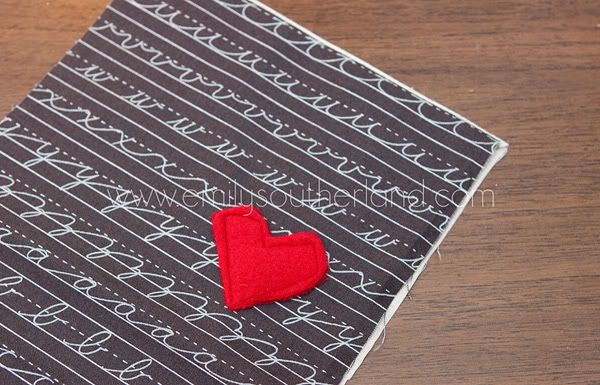
Applique a cute thingy on the front of the fun fabric, if you like. This is best done before you stitch the fabrics together. I used fleece, and straight-stitched a heart. to determine where to put it, I folded the fabric in half like it will be eventually, and eyeballed the spot the heart would look good, then pinned it, unfolded the fabric, and sewed.
Step Two (sorry for that random, out-of-order step just now):
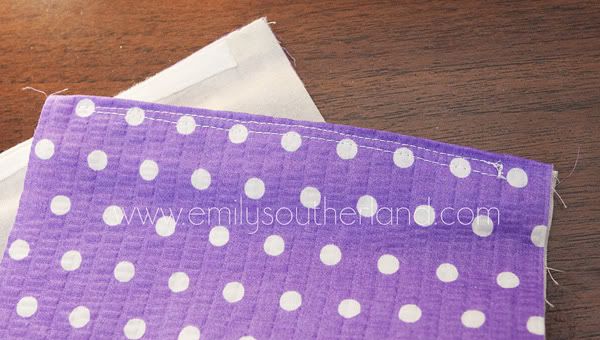
Turn the bag right side out and press the seams.
Step Three:
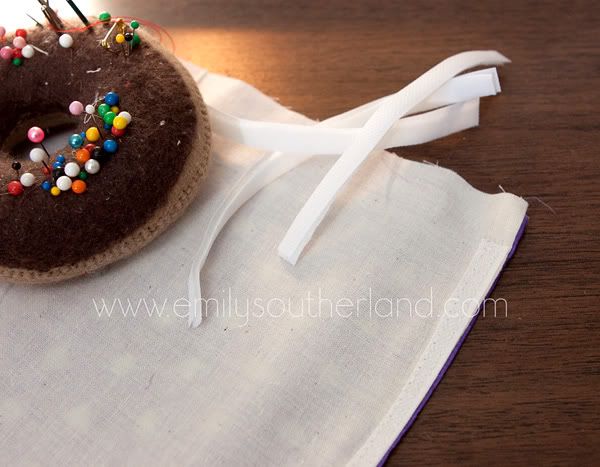
Cut your Velcro to 6" (if your short sides of the piece are 7". If you made up your own size, cut the Velcro an inch shorter than the short side). Then cut the Velcro in half so you have two long skinny pieces. The tutorial I learned from explains this was to make it easier for small hands to pry the bag open. Also, it says to use non-sticky-backed Velcro so it doesn't gum up your machine needle. I concur.
Then stitch the Velcro onto the short, stitched sides of your piece, on the muslin side, using a straight stitch.
Repeat for the other end:
Step Four (This is MY little addition to the original tutorial):
Cut a little length of a cute matching ribbon. Fold it in half, then pin it so the fold faces inward on the fun fabric, like this--
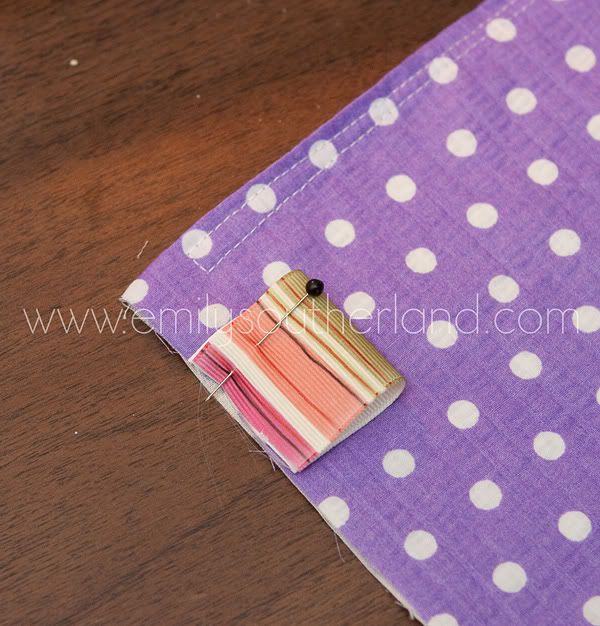
This will be a decorative touch, just for fun.
Step Five:
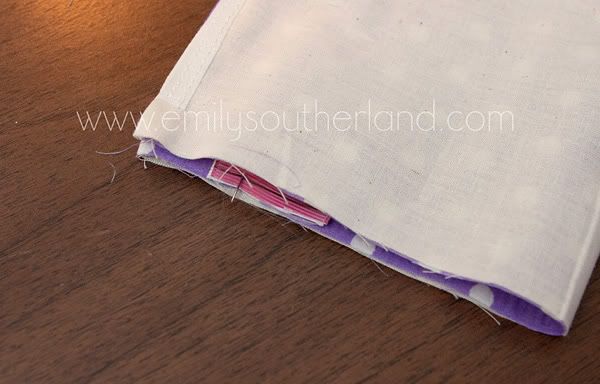
Fold your piece in half with the fun fabric facing in. you are now going to stitch the open sides so it becomes an enclosed bag. When you do this, the ribbon will automatically be stitched into your bag and when you turn it right side out, it will be that cute ribbon tag you see on the sample photo at the top.
Step Six:
Stitch a straight stitch from the top of each open side to the bottom, backstitching on top and bottom. Then, if you really want to be thorough, you can fake-serge the raw edges of the fabric by zig-zag stitching a wide zigzag right at the edge, catching the loose edges--
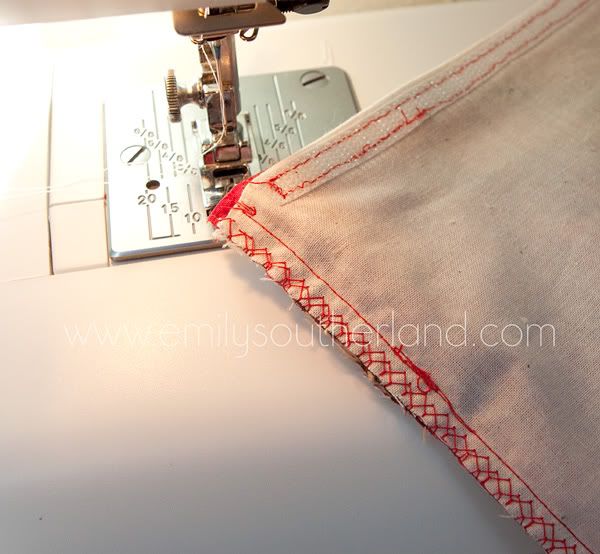
See how there is a straight stitch to hold it together, but then the zigzag helps "seal" in the frayed edges? Nice! (Forgive the red thread here. Yes, I photographed a DIFFERENT bag than that purple one for this step.)
And then turn the whole thing right side out and YOU HAVE A SNACK BAG!
The first one might take a little time to get the feel for it, but once you've made one, you can crank out like 4 or more an hour, if you feel so inclined. These are very simple, and are great for doing "assembly line" style-- doing all the "Step Ones" together, then the "Step Twos" etc. etc.
And really, who WOULDN'T want one of these? Sure, they are great for kids. But I plan to use one in the movies when I sneak in my own M&Ms. And I think all our hubbies would love us if we made tweed ones for them to take to church so they can have their OWN cheerio stash. Right?
The possibilities are endless. And since they are lined, you can even put things like apples, carrots, etc. in them with little risk of the fabric getting too soggy. And they WASH, so even if they DO get a bit gross, you can WASH THEM! :) Huzzah!
No go forth and make snack bags! Give them as gifts!
*
And that's it for me tonight. I REALLY need to finish editing this one session, but in the process of moving Noah away from the monitor (AGAIN) I brushed the controls and "reset" the calibration to DEFAULT. And frankly, the thought of recalibrating, on top of all the other headaches I have going on right now, makes me want to sit and cry. SO I am boycotting the computer the rest of the night and I am going to pack the heck outta this apartment so that tomorrow, maybe I won't have to do much of anything. Hmm.... A girl can dream.
Off I go!
*
CUTE, right?!? I LOVE these. Reusable Snack Bags. I saw these for the first time this September when I was in California doing photos. Jennie had some in her diaper bag, and I SWOONED. I made her talk to me about them for MUCH longer than what was probably polite, but she humored me, and I was satiated. She had gotten them on Etsy, she said, and there were several versions from several artists. I vowed then and there to look them up and try a few of my own.
When I got home from my trip, she emailed me a link to a blog that had a tutorial. How sweet of her, really! I was EXCITED and after obtaining some unbleached muslin, I started trying these things out. They turned out to be SUPER easy, REALLY satisfying, and honestly, they make the cutest little gift to give someone, just because.
Here, based on ReproDepot's Tutorial, with a few additions of my own, the Reusable Snack Bag-- the perfect GREEN way to tote around Goldfish crackers, raisins, pretzels, Cheerios, Yo-Gos, and pretty much anything else you want, except maybe applesauce.
Materials:
Cute cotton outer fabric
Unbleached muslin for the lining
NON-STICKY Velcro
Thread
Ribbon/felt/fleece if you want
Step One:
Cut the fabrics. You want about 7"x12", but this can be altered based on your needs or on your fabric stash. Just make sure that the muslin and the cute fabric are the same size.
Place the two pieces with the right side in, and stitch along the shorter sides, both sides, about a 1/4" to 1/2" seam.
Optional PRE-Step One:
Applique a cute thingy on the front of the fun fabric, if you like. This is best done before you stitch the fabrics together. I used fleece, and straight-stitched a heart. to determine where to put it, I folded the fabric in half like it will be eventually, and eyeballed the spot the heart would look good, then pinned it, unfolded the fabric, and sewed.
Step Two (sorry for that random, out-of-order step just now):
Turn the bag right side out and press the seams.
Step Three:
Cut your Velcro to 6" (if your short sides of the piece are 7". If you made up your own size, cut the Velcro an inch shorter than the short side). Then cut the Velcro in half so you have two long skinny pieces. The tutorial I learned from explains this was to make it easier for small hands to pry the bag open. Also, it says to use non-sticky-backed Velcro so it doesn't gum up your machine needle. I concur.
Then stitch the Velcro onto the short, stitched sides of your piece, on the muslin side, using a straight stitch.
Repeat for the other end:
Step Four (This is MY little addition to the original tutorial):
Cut a little length of a cute matching ribbon. Fold it in half, then pin it so the fold faces inward on the fun fabric, like this--
This will be a decorative touch, just for fun.
Step Five:
Fold your piece in half with the fun fabric facing in. you are now going to stitch the open sides so it becomes an enclosed bag. When you do this, the ribbon will automatically be stitched into your bag and when you turn it right side out, it will be that cute ribbon tag you see on the sample photo at the top.
Step Six:
Stitch a straight stitch from the top of each open side to the bottom, backstitching on top and bottom. Then, if you really want to be thorough, you can fake-serge the raw edges of the fabric by zig-zag stitching a wide zigzag right at the edge, catching the loose edges--
See how there is a straight stitch to hold it together, but then the zigzag helps "seal" in the frayed edges? Nice! (Forgive the red thread here. Yes, I photographed a DIFFERENT bag than that purple one for this step.)
And then turn the whole thing right side out and YOU HAVE A SNACK BAG!
The first one might take a little time to get the feel for it, but once you've made one, you can crank out like 4 or more an hour, if you feel so inclined. These are very simple, and are great for doing "assembly line" style-- doing all the "Step Ones" together, then the "Step Twos" etc. etc.
And really, who WOULDN'T want one of these? Sure, they are great for kids. But I plan to use one in the movies when I sneak in my own M&Ms. And I think all our hubbies would love us if we made tweed ones for them to take to church so they can have their OWN cheerio stash. Right?
The possibilities are endless. And since they are lined, you can even put things like apples, carrots, etc. in them with little risk of the fabric getting too soggy. And they WASH, so even if they DO get a bit gross, you can WASH THEM! :) Huzzah!
No go forth and make snack bags! Give them as gifts!
*
And that's it for me tonight. I REALLY need to finish editing this one session, but in the process of moving Noah away from the monitor (AGAIN) I brushed the controls and "reset" the calibration to DEFAULT. And frankly, the thought of recalibrating, on top of all the other headaches I have going on right now, makes me want to sit and cry. SO I am boycotting the computer the rest of the night and I am going to pack the heck outta this apartment so that tomorrow, maybe I won't have to do much of anything. Hmm.... A girl can dream.
Off I go!
*
Cute bags! I don't know a person alive who couldn't use one! I love that you said you would sneak in your own M&Ms. We sneak in our own candy, too....and drinks! :) Are you a Seinfeld fan? Cafe Lattes at the movies, anyone?
ReplyDeleteEm- I'm going to make someone help me with those. They are adorable...and a great idea!
ReplyDeleteLove these. I bought the materials to make some but haven't gotten around to it yet. Love the tutorial!
ReplyDeleteGood idea... yet another one on my list. New shopping list: Muslin.
ReplyDeleteGreat idea and so green! I love the idea of being able to wash them over and over again.
ReplyDeleteEm, I was already thinking movies before you mentioned it! Brilliant idea! Love these!
ReplyDeleteThis is a fun one too. So many cute ideas! Hopefully you get enough done you don't have to pack:)
ReplyDeleteYikes...that stitching is freaking me out. Is it hard? Or just time consuming? Or neither...or both?!?!
ReplyDeleteAhhh! I'd love to make these...but what's the real skill level?
very cute!
ReplyDeleteAgain, you're really making me yearn for a sewing machine. So cute. I'm loving these tutorials.
ReplyDeleteThose ARE darling- and so eco friendly! Good luck with the move. These are also the way you would make a grab and go diaper bag (holds one or two diapers and a travel pack of wipes) just make the dimensions fit that style. Those also make great gifts.
ReplyDeleteThis looks like something I would also use to store a stash of baby wipes but I think I might also use a ziplock bag to make sure the fabric wasn't all wet. What a great idea.
ReplyDeleteSuch cute snack bags~ Love the tutorials you are giving...helps a lot to visualize
ReplyDeleteThat is really cool! I am enjoying all of these tutorials!
ReplyDeleteThis is so great! I'm definitely going to try it and also maybe make some to hold baby supplies in a diaper bag! Perfect!
ReplyDeleteI actually purchased a tutorial on Etsy to make these -- maybe this will be the inspiration to DO it. Once I get that sewing machine (or steal my mom's) that is....
ReplyDeleteSuper cute, I like your added ribbon on the side, and just for the record, I have completed my extra credit and did a very quick and very lame shout out on my blog....http://ojibirish.blogspot.com/ :)
ReplyDeleteAdorable bags. I am thinking that would make a cute pencil case for my niece with a little modification
ReplyDeleteLove it. I use way too many sandwich bags. Thanks!
ReplyDeleteAnd good luck with the packing. Moving is sucks but it kind of feels good to go through and organize all your junk.
I can definitely make this and it will be SO useful. Thanks!
ReplyDeleteThese are perfect! I can think of SO many uses for them.
ReplyDeletei have been waiting all week for this one!
ReplyDeleteThis is so perfect. I love how practical they are.
ReplyDeleteI definitely want to make them.
Wonderful idea. Christmas gifts in mass are my favorite!
ReplyDeleteGosh, there are tons of uses for something like this. You are my hero.
ReplyDeleteToo cute!
ReplyDeleteLove those. I'm making some... Tonight. My girls will be thrilled.
ReplyDeletei bought material with the intention of making some of these but still haven't gotten around to it. thanks for the tutorial! <3
ReplyDeleteThese are so adorable! But sorry that you have had quite the night!
ReplyDeletea way better alternative to all the ziplocks!
ReplyDeleteOMG, I can do this! Except for the zipper. But what great practice, maybe by the 30th one I'll have zippers DOWN. Yo. I love the little applique idea, k-ute.
ReplyDeleteYeah, can you tell I haven't had my coffee yet? Velcro = genius. Something even I can do! And that means I think I have all the supplies I need. YAY!
ReplyDeleteEmily, what a fun idea! I love it.
ReplyDeleteSo stinkin' useful!!
ReplyDeleteGreat idea. Your fabrics are so pretty!
ReplyDeleteI see some of these as Christmas pressies for my mommy friends/their kida!!!
ReplyDeleteThanks!
These would be perfect to sneak snacks into a movie or church! Too exciting!
ReplyDeleteI have the snack bag tutorial you linked bookmarked and on my list of projects to make this winter. We may be twins. ;)
ReplyDeleteI was thinking of deconstructing an old insulated lunch box we have and using the inside of it as the lining so the snack bag could be wiped out.
Another great tutorial!
I've been working on a few of these myself - but now want to take them all apart to add the beautiful ribbon tag. That's the perfect little touch!
ReplyDeleteAnother 'must-make'! Since I have a baby on the way, she'll definitely need something like this for the diaper bag!
ReplyDeleteLove the little bags and thanks for the tutorial. One of these days!!
ReplyDeleteOK, I've had these on my crafty to-do list for quite awhile but was stumped about what to use for the inner liner. Didn't want to use toxic plastic, you know? Never thought of muslin, genius! Lyn(say)
ReplyDeleteLove your tutorial, I will give it a try. I've tried it on my own and I can't get it to look right. I'm going to try it with nylon as a liner to make it easier to clean. Thanks!
ReplyDeleteI have been looking for one of these tuts that isn't so BORING!! yours is so cute!! THanks!
ReplyDeleteeye like it!
ReplyDeleteWhat a fantastic idea!! Love it :)
ReplyDeleteVery very very handy!
ReplyDeleteThese are great!
ReplyDeleteI was just talking with my oldest about how we use too many disposable bags (and lose too many of those little tupperware-type lids). If I could pull off these (possibly with cheesy Star Wars fabric) I'd solve our problem and be a mom hero.
ReplyDeleteI'll feel so much cooler at church when my kids are throwing cheerios out of THIS bag.
ReplyDeleteWhat a great idea. I hate using ziplock bags. You could use oilcloth or some cloth diaper lining to make the inside more soggy food friendly. :)
ReplyDeleteMust make 900 of these!!! Love them!!!
ReplyDeleteAwesome idea. Something that can be washed and reused over and over for snacks on the go with the toddlers!
ReplyDeleteI don't know about snacks but these would be good for knitting stuff too!
ReplyDeleteCute tutorial!
Another MUST make! I am always looking for ways to be a little more eco-friendly -- these bags are fabulous!
ReplyDeleteyou are so making me want to get my sewing machine out and I just can't right now I have so much other stuff I should be doing!
ReplyDeleteyou are so making me want to get my sewing machine out and I just can't right now I have so much other stuff I should be doing!
ReplyDeleteThose are cool. And I love the ribbon-tab add-on. Easier for tiny hands.
ReplyDeleteI am so excited about this one - what great gifts and I even already have the materials. Of course, I will be self gifting as well. Thanks Em!
ReplyDeleteDreaming is how you got here, baby. (That's what I like to say!)
ReplyDeleteAwesome tutorial! If you attach one of Baby's plastic links to your cute ribbon tab it will be easy to attach to a purse, diaper bag strap, or stroller. I can't wait to make a few of these!
ReplyDelete