
Oh GOODNESS I am so tickled at the response I've gotten already! I really hoped this stuff would resonate with some of you... I hoped this would be a refreshing thing to play along with. Thank you for coming with me on this fun week's adventures!
Before I begin the tutorial, a few clarifications, and answers to a couple of questions from last post's comments:
Before I begin the tutorial, a few clarifications, and answers to a couple of questions from last post's comments:
1. If you are late to the party, that is okay. Just go back to Day One, check it out, and leave a comment there. You can catch up even if it is Thursday or Friday!
2. To get an extra entry in the drawing, you just have to blog about my Tutorial Week, and maybe add some other favorite inspiration sites in your post, to keep it interesting to your readers. Tell them about this contest, but then maybe link up a few other fun sites like Etsy or other crafty bloggesses you know. Fun!
3. If you leave a couple of comments on one day (like my hilarious friend Gen who had to clarify that she wants a PRIZE, not a BABY)... that won't disqualify you at all. I'll count unique visitors once each day, even if you comment three times, for whatever reason.
4. Someone asked what sewing machine I use: I use a very simple little Husquavarna called the HuskyStar 207. I am not sure it is even being made currently, but I have NO complaints about the brand, which also sells Vikings. It has NO bells and whistles, but it is sturdy and hard working and I love it.
5. If anyone has any other fun questions for me (crafty-related, or even totally off-topic!), I'd be thrilled to answer them in the following day's post, so ask away, in the comments.
Okay, on to the CELEBRATION!
Tutorial #1: The CELEBRATE Banner
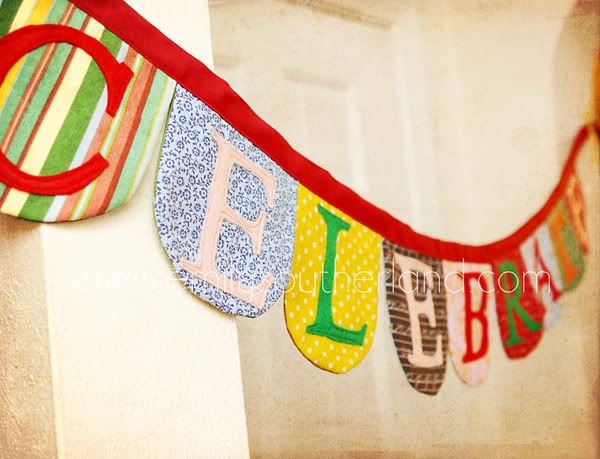
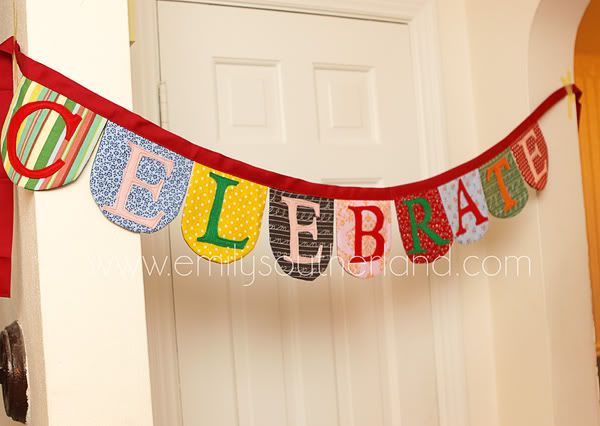
This sweet little creation is one of my new favorite possessions. I love it because it is universal-- you can celebrate ANYTHING, regardless of the time of year or reason. In fact, though it is perfectly multicolored enough to be used at Christmas, birthdays, graduations, boy events, and girl events, the things I most look forward to hanging this up for are the small victories and days when my children (or hubs!) just need to know their everyday achievements are being noticed... So I love the thought of hanging the banner for a great spelling test grade... Or a Boy Scout merit badge earned, or a raise at work... or an unbirthday party with cookies for dinner's main course. I love the thought that there is ALWAYS a reason to CELEBRATE.
I DIRECTLY credit the inspiration for this lovely banner to the Etsy shop, The PolkaDot Parlour, by Morgan Moore. She is currently closed, preparing for a new little one, but over a year ago, I found her version of the banner and bookmarked it, determined to make my own one day. It only took a year to get my butt in gear, but once I finally got to it, I found that it was satisfyingly meticulous, but ultimately pretty easy to make. The hardest (and most fun part, to my crazy mind), is the slow, methodical, careful outlining of the felt letters with your machine-- carefully making sure to catch each corner and each curve. It took the longest, but was the most "fun". Weird. I know.
So. Wanna make your own? Here, my steps:
1. Prepare Letter Pattern:

To get the pattern for my letters, I went into Microsoft Word and typed the word "celebrate", then enlarged it until each letter was between 3" and 4" tall. This ended up making each page only have about 2 letters on it, which was fine. I went with the standard "Times New Roman", in capital letters, but you could go with a million other fonts and styles. After printing them, I cut them each out-- not PERFECTLY, as you can see, 'cause, well, that's just really too meticulous for me.
2. Pin/Draw/Cut Letters:
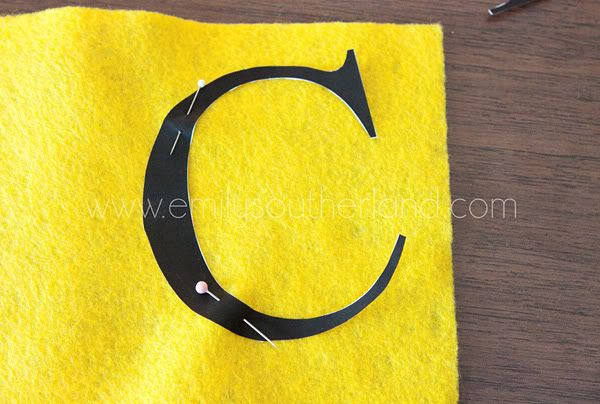
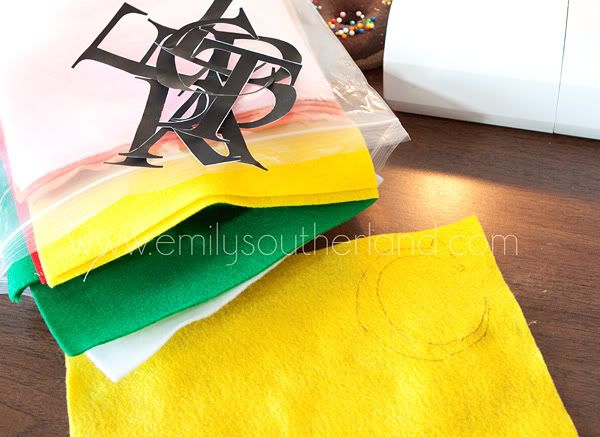
I used cheapo standard felt from Walmart... But in my perfect world, I'd buy the "sample pack" of wool felt from HERE, **swoon** and only ever use this felt. It is between 65% and 80% pure wool, and I LOVE the idea of having this on hand all the time. Alas.... I haven't pulled the "buy" trigger yet... Just... Trying to be thrifty, I guess.
As for cutting the letters, I tried two ways-- keeping the pattern pinned on and cutting around it, then tracing the pattern and cutting it without the paper on top. I likes the pen method better, but had to be careful not to keep the ugly pen line on the final letter. Go with your heart on this one.
3. Cut the Scallops:
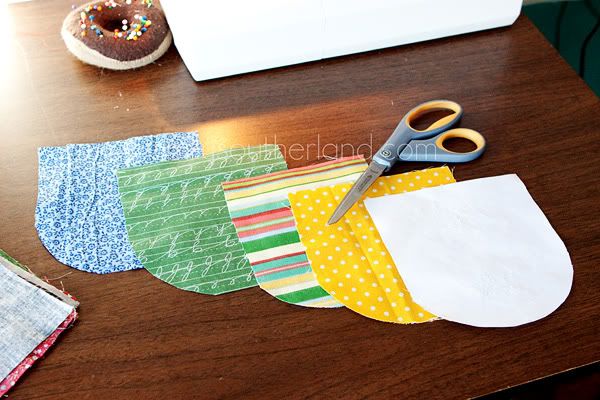
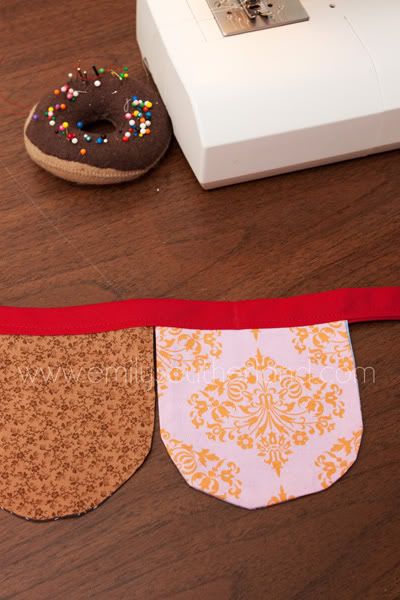
I drew my own pattern, made it a square with the rounded part added onto the bottom with the final measurements about 5.75" x 6". I cut 18 total, one for each letter, and one for the back of each letter. (This banner looks pretty from behind, too!) I intentionally mismatched fabrics and patterns, then played and rearranged the pairs until I liked the result. This is a GREAT project for using scraps!!! :)
#4. Pin and Sew the Letters:
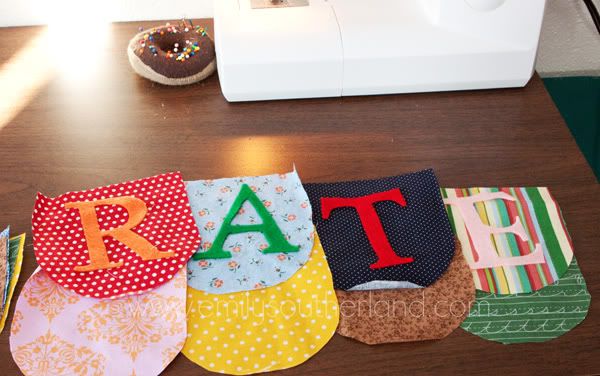
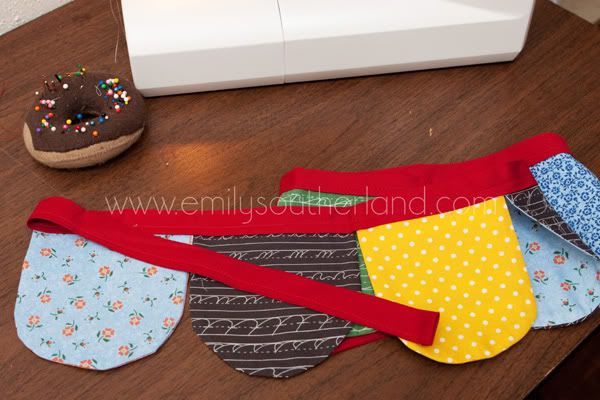
The first image here shows my preparations before sewing-- making sure each color of letter looks good on its fabric, and each pattern is not next to a duplicate pattern, and then making sure the back looks good with the front. It was all more work than it had to be. I think this thing would look charming even without all that arranging and rearranging. Just go with it. You can be like me, or be a LOT more chill about it. In fact, you could go with all one fabric and all one letter color and call it good. That would STILL be cute!
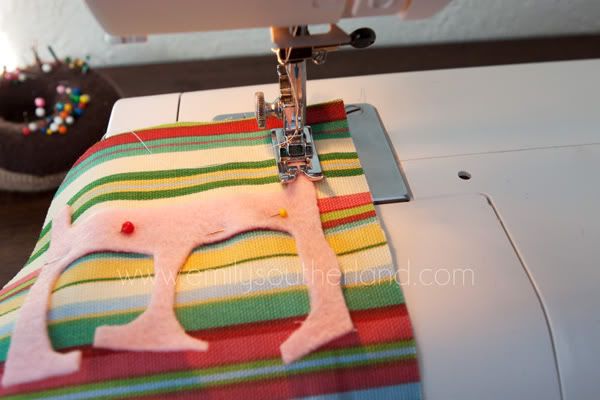
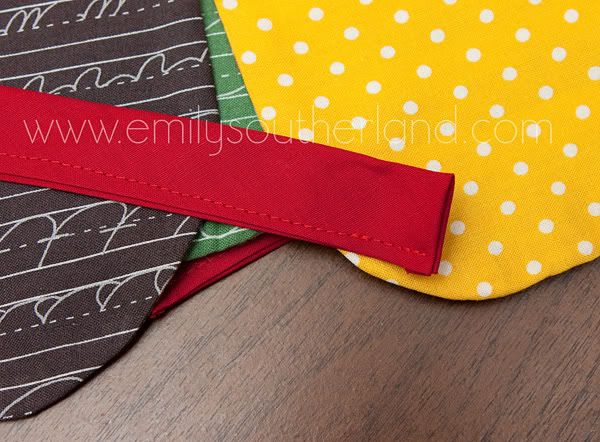
The second image shows only a small portion of the gleeful process of sewing on each letter. I didn't pin the heck out of it because felt sticks so well on fabric... And I was going so slow as I stitched that I could readjust the letter parts as needed. I used a medium stitch, but not a TINY one, because if you make your stitches too small, it bunches up the felt and takes even LONGER, if possible. I outlined the entire letter, as well as the inner cutouts for each letter.
Make sure you keep the letter away from the edges of the scallop at least 1/2", so there is room to sew the scallop later.
#5: Sew The Scallops:
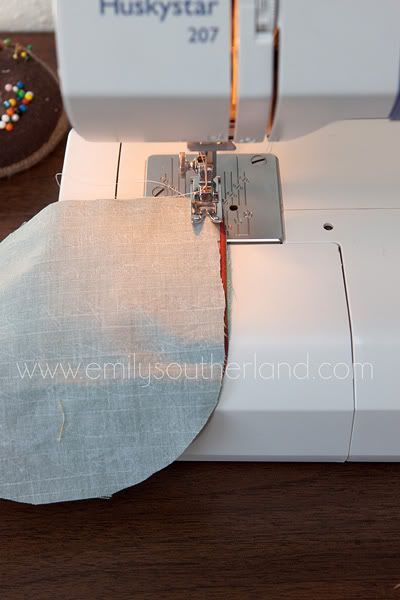
After sewing on every letter, you now get to sew your fronts to your backs. Place them RIGHT SIDES facing in, and sew with a 1/4" seam around the "u" part, leaving the top unstitched.
Once you've sewed the scallop, snip the curves (dang it! I didn't take a picture of this! If it confuses you, let me know!). Basically, to make sure the curve stretches nicely and un-boxy, you clip the edges every 1/4 inch or so, from the edge of the fabric to just before the seam. DON'T CLIP THE SEAM! Bad!! You only have to do this where the curve is, so the straight sides can be left alone.
after clipping the curves, turn the scallops right-side out and press.
#6: Put it All Together:
(Ah, look at those fabrics together in harmony-- the fancy Amy Butler pink with the cheapo Walmart brown calico... See? We can ALL get along!)
To bind the scallops together, I used standard 1" Bias Tape from the notions section of your Walmart or Joann's Fabric (or Hobby Lobby. Or Hancock. Whatever!) Place each scallop, in order, inside the bias tape until the raw edge is bumped up to the fold. Pin each one with one or two pins to hold them in place. Make sure there is about 2 feet of extra bias tape on each side, like this:
To begin stitching, fold in the short edge of one of the ends about a half an inch, then begin sewing, making sure to backstitch.
Continue topstitching the whole bias tape length, making sure to catch each scallop and fold in the other end nicely. I did this between 1/4" and 1/8", to keep it looking neat.
I DIRECTLY credit the inspiration for this lovely banner to the Etsy shop, The PolkaDot Parlour, by Morgan Moore. She is currently closed, preparing for a new little one, but over a year ago, I found her version of the banner and bookmarked it, determined to make my own one day. It only took a year to get my butt in gear, but once I finally got to it, I found that it was satisfyingly meticulous, but ultimately pretty easy to make. The hardest (and most fun part, to my crazy mind), is the slow, methodical, careful outlining of the felt letters with your machine-- carefully making sure to catch each corner and each curve. It took the longest, but was the most "fun". Weird. I know.
So. Wanna make your own? Here, my steps:
1. Prepare Letter Pattern:
To get the pattern for my letters, I went into Microsoft Word and typed the word "celebrate", then enlarged it until each letter was between 3" and 4" tall. This ended up making each page only have about 2 letters on it, which was fine. I went with the standard "Times New Roman", in capital letters, but you could go with a million other fonts and styles. After printing them, I cut them each out-- not PERFECTLY, as you can see, 'cause, well, that's just really too meticulous for me.
2. Pin/Draw/Cut Letters:
I used cheapo standard felt from Walmart... But in my perfect world, I'd buy the "sample pack" of wool felt from HERE, **swoon** and only ever use this felt. It is between 65% and 80% pure wool, and I LOVE the idea of having this on hand all the time. Alas.... I haven't pulled the "buy" trigger yet... Just... Trying to be thrifty, I guess.
As for cutting the letters, I tried two ways-- keeping the pattern pinned on and cutting around it, then tracing the pattern and cutting it without the paper on top. I likes the pen method better, but had to be careful not to keep the ugly pen line on the final letter. Go with your heart on this one.
3. Cut the Scallops:
I drew my own pattern, made it a square with the rounded part added onto the bottom with the final measurements about 5.75" x 6". I cut 18 total, one for each letter, and one for the back of each letter. (This banner looks pretty from behind, too!) I intentionally mismatched fabrics and patterns, then played and rearranged the pairs until I liked the result. This is a GREAT project for using scraps!!! :)
#4. Pin and Sew the Letters:
The first image here shows my preparations before sewing-- making sure each color of letter looks good on its fabric, and each pattern is not next to a duplicate pattern, and then making sure the back looks good with the front. It was all more work than it had to be. I think this thing would look charming even without all that arranging and rearranging. Just go with it. You can be like me, or be a LOT more chill about it. In fact, you could go with all one fabric and all one letter color and call it good. That would STILL be cute!
The second image shows only a small portion of the gleeful process of sewing on each letter. I didn't pin the heck out of it because felt sticks so well on fabric... And I was going so slow as I stitched that I could readjust the letter parts as needed. I used a medium stitch, but not a TINY one, because if you make your stitches too small, it bunches up the felt and takes even LONGER, if possible. I outlined the entire letter, as well as the inner cutouts for each letter.
Make sure you keep the letter away from the edges of the scallop at least 1/2", so there is room to sew the scallop later.
#5: Sew The Scallops:
After sewing on every letter, you now get to sew your fronts to your backs. Place them RIGHT SIDES facing in, and sew with a 1/4" seam around the "u" part, leaving the top unstitched.
Once you've sewed the scallop, snip the curves (dang it! I didn't take a picture of this! If it confuses you, let me know!). Basically, to make sure the curve stretches nicely and un-boxy, you clip the edges every 1/4 inch or so, from the edge of the fabric to just before the seam. DON'T CLIP THE SEAM! Bad!! You only have to do this where the curve is, so the straight sides can be left alone.
after clipping the curves, turn the scallops right-side out and press.
#6: Put it All Together:
(Ah, look at those fabrics together in harmony-- the fancy Amy Butler pink with the cheapo Walmart brown calico... See? We can ALL get along!)
To bind the scallops together, I used standard 1" Bias Tape from the notions section of your Walmart or Joann's Fabric (or Hobby Lobby. Or Hancock. Whatever!) Place each scallop, in order, inside the bias tape until the raw edge is bumped up to the fold. Pin each one with one or two pins to hold them in place. Make sure there is about 2 feet of extra bias tape on each side, like this:
To begin stitching, fold in the short edge of one of the ends about a half an inch, then begin sewing, making sure to backstitch.
Continue topstitching the whole bias tape length, making sure to catch each scallop and fold in the other end nicely. I did this between 1/4" and 1/8", to keep it looking neat.
*
And you are DONE! Ready to celebrate, no matter WHAT the occasion!
Tomorrow, I will tell you ALL about that cute little fire truck below, and what exactly it's sitting on... So tune in! And don't forget to comment, to keep qualifying for the giveaway at the end of the week! Love y'all for making my day so delightful with all your comments!!
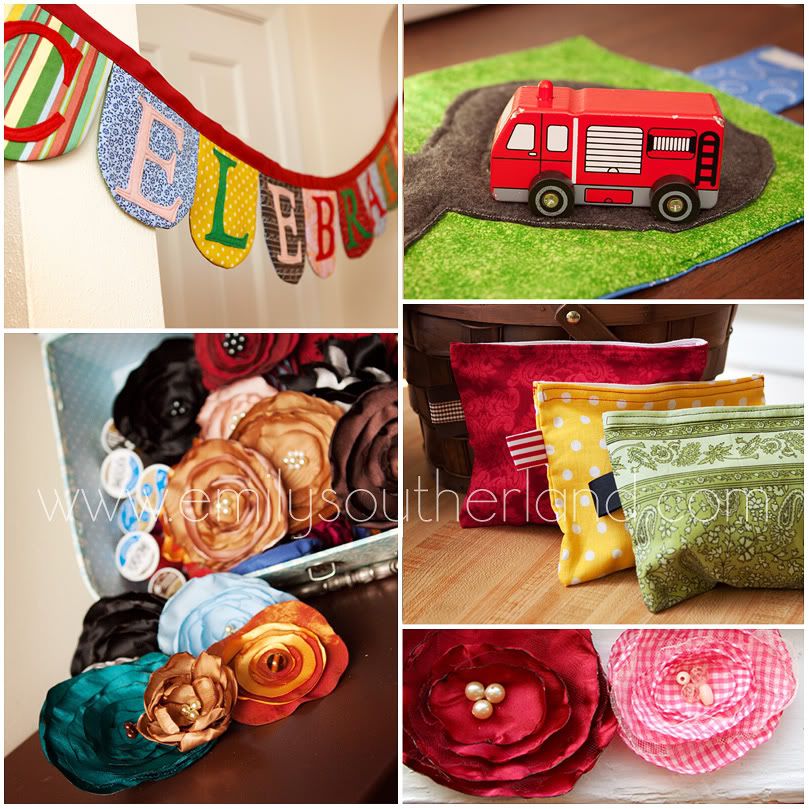
Tomorrow, I will tell you ALL about that cute little fire truck below, and what exactly it's sitting on... So tune in! And don't forget to comment, to keep qualifying for the giveaway at the end of the week! Love y'all for making my day so delightful with all your comments!!
love the idea of a universal banner and it's "sew" easy- anyone could make it!
ReplyDeletewhere do you get all your cute fabric? i know, i know, probably random scraps you have...
Em- It's great! :) Wish I could sew! hahaha! Can't wait to see what's next
ReplyDeleteWhat a cool banner! It's now on my "After the semester to do list" which keeps growing :D
ReplyDeleteYou are so clever. That is so over my head...maybe someday... :)
ReplyDeleteI am so making one one these banners before 2011! Thank you so much for doing this, it is such joy to see your work, step by step, and to "hear" your thought process. I can't wait for tomorrow.....
ReplyDeleteSo super cute.
ReplyDeleteOne thought. If you want to trace the letters before cutting them out, just trace the letter backwards on the wrong side of the fabric so the if the ink does get on the fabric it is one the backside of the letter.
I want to make it right now. Let's see, which box is my sewing machine in? hmmm...
ReplyDeleteI can't wait for the rest of the week. I've always been envious of your eye for color.
Very cute! I'm guessing mine wouldn't look quite as pretty. I might have to practice on something easier first...
ReplyDeleteLove this banner. Probably have five snippets from pottery barn kids magazines of things like this to one day make. I guess today's the day. thanks for the tutorial. and i love the idea of hanging it for everything. kev's family had a family flag that was hung outside on big days, starting with his dad's test days during school way back when. they even got on the news for it:)
ReplyDeletethat makes me want to sew!
ReplyDeleteI made a banner similar to this out of scrapbook paper...can't wait to try it with fabric. Super cute!
ReplyDeleteWow. That is ADORABLE, but I can't imagine going to that much work. It would take me twice as long as you, because not only do I agonize over color combos, etc., but I also stink at sewing and would panic over every step. Sigh. Maybe I'll pass it on to my sister who is learning to sew. Noah was great today! You should have seen Callum's face when he spotted him after waking up from his nap. He was FREAKING OUT he was so excited. It was hilarious. And adorable. Would you like me to do you a friendly favor and watch Noah for you as you move on Saturday? I wouldn't mind a bit!
ReplyDeleteI don't really know how to sew, so reading how to do this I felt like my brain was going to explode. LOL! Knowing me, I will probably make one for each holiday and birthday. I like to have variety. Unneccesary variety.
ReplyDeleteLove this banner! It was perfect at Noahs party and now I can have one too! Woo hoo!
ReplyDeleteI made one for my daughter's 2nd Birthday, I will post it on my blog tomorrow.
ReplyDeleteTotal inspiration.
ReplyDeleteThese types of things are intimidating to me, but what I love about this is that you've made it accessible, if I ever do swallow my fear and pick up a needle and thread...or a piece of fabric...or a sewing machine. (Wait, sewing machines are heavy.)
ReplyDeleteSomeone mentioned making one of these with scrapbook paper...now THAT I could do, until I can do a copy of yours. :)
Absolutely LOVE this and I'm going to make one soon! As soon as I come up with baby's name, I'll make a banner with his name on it to hang over his crib! Thank you for the instructions!
ReplyDeleteThat is very cute. You could personalize it for anything!
ReplyDeleteLOVE the 'Celebrate' banner, and I'm a visual person, so I LOVE the step by step instructions WITH pics! Now, if I only had a sewing machine...hmmmm
ReplyDeleteAll your efforts to make a darling banner are well worth what you went through!! It is VERY cute!
ReplyDelete1) First of all, I was all excited when I thought I saw my favorite kind of donut in the back of one of the pictures--chocolate with sprinkles. Then, sad day, I realized that it was a pin cushion, albeit a hip one. Sadly, I am still thinking about donuts now.
ReplyDelete2) I originally thought...eh, this is super cute but not something I'd make...but now I am considering making something like it, especially with the idea that you can hang it when you're celebrating ANYTHING...even a good day at work!
3) I had the same thought as a previous about tracing the letters backwards on the back of the felt to avoid pen marks. My analytical mind is not so good for creative things, but something useful for solutions like this!
Omg...love it! You make the cutest stuff!
ReplyDeletei'll need to steal back my mom's sewing machine over christmas...
ReplyDeleteI wish I didn't live in fear of my sewing machine.
ReplyDeleteSo cute! I wish I knew how to sew! One of these days when I have money to buy a sewing machine I'm going to try to teach myself.
ReplyDeleteSo fun, I can't wait to make one. You are right, I could give it as a gift with a quick explanation (like you did) for any occasion... and I will definately make one for ME! Thanks for sharing your ideas.
ReplyDeletePerfect for my many scraps of fabric!
ReplyDeleteThis is just perfect. I am imagining all the ways I could use my scraps and maybe change the design a tad to suit me. Thanks for the inspiration to get my sewing machine out of the garage! And to finally comment on your blog!
ReplyDeleteyou inspire me... plain and simple.
ReplyDeleteAhhh, so THAT's where you get bias tape. I thought you had to make your own. Well, that simplifies things. I think I'm going to make on with Ellie's name on it for her room since I never did the whole name thing. Or maybe something else with fewer letters because I'm pretty sure sewing around 8 letters would drive me insane.
ReplyDeleteor nine letters because celebrate has nine letters. more coffee.
ReplyDeleteI love it! When this babe has grown a bit, perhaps there will be time to sew. If so, I believe this will be my first project. I instantly fell in love with it when I saw the pic yesterday.
ReplyDeleteI have to tell you that yesterdays post made my day. I was happier all day with all the creative and freeing thoughts I had of what was still in my power to do to celebrate life. Thank you so much for your example- it really was an answer to prayer.
Ooh, I feel I could quite possibly make one of these. Off to inventory my fabric...
ReplyDeleteAnd thank you for solving the mystery of bias tape! I thought that was code for something much more complicated! LOL
Sadly, I will probably have to stick to my paper banners (though a fabric one for the little bean would be a LOVELY idea). I am a sewing newbie and this goes beyond my current skill level (I am already having a difficult time sewing simple capes for the girls):(
ReplyDeleteI probably won't be able to comment after today, but it's my own fault with still no home internet. Nevertheless, I think this is a cute idea - thanks for sharing :-)
ReplyDeleteVery cute, and I love how universal it is.
ReplyDeletefiling this project away for a rainy day...or a day that my three kids don't need me, lol. can't wait for tomorrow!!!!! :)
ReplyDeleteThis makes me really really really wish I had been able to take home economics in high school...tough to find time to learn how to sew know.
ReplyDeleteMaybe I'll drop a not so subtle hint to my mom. ;)
Em, definitely on my to due list when I learn to sew. I love it, the idea, the colors, the future moments to celebrate.
ReplyDeleteI actually think I could do this! I am SO going to do this! I just wish my local fabric store had fabrics as cute as yours... but I think that even with not-as-great fabrics, it could be a fun addition to our family celebrations. Thank you!
ReplyDeleteI love this! My friend has a Happy Birthday banner in her home that is similar - but I love the open occasions that this one allows.
ReplyDeleteAnd I stared at your stitches for five minutes in awe of their straightness...
Very cute, Emily!
ReplyDeleteI just found you through my friend SHelly. She knows I am always looking for a fun and fabulous tutorial. I just love your blog! So fun. And I am excited to see what other great tutorials youa re hosting this week. fun fun fun!
ReplyDeleteThis is great, perfect timing, lady! I'm making a banner very similar to that for my girls bedroom (in oranges, reds, light blues...are you picturing it?) I didn't think of doing letters, but it would be sweet to stick in their names or initials.
ReplyDeleteLOVE it! Maybe I can get my mom to help me make one :)
ReplyDeleteI think I might have to make this for a special kindergarten teacher as an end of year gift!
ReplyDeleteI am in love with this banner. Absolutely and completely. You've inspired me to pull out the sewing machine and try to remember how to thread it : )
ReplyDeleteLove this too! (I'm going backward, I started with your last post, the mailbox.) I haven't read all the comments, so I don't know if this was mentioned. If you flip your letter and trace it backward, you don't have to worry about the pencil line showing when you cut it out. :)
ReplyDeleteAh--I can so see so many different ways to make this! Definitely going to have to try my hand at a 'happy bday' banner!
ReplyDeleteWhile I have done some buntings for general merriment, I haven't gone to the word stage yet. I LOVE it - and think I'll do them for the boy's room with their names. I love what different fonts could do to the overall look, too. Nicely done!
ReplyDeleteWhat a GREAT banner!! Thanks for sharing all this great info!!!
ReplyDeleteVery cute! I love these fabric buntings. The felt letters are the perfect touch. Lyn(say)
ReplyDeleteLove your banner, I'm soooo inspired to try! Thank you Emily!
ReplyDeleteLove this banner! I am going to have to make me one now! Hope your move is going well
ReplyDeleteI want to make one for Timmy and Dacia for their room!
ReplyDeleteYou make it look SO easy, I'm gonna try it!
ReplyDeleteYou know, I have been looking for a cheap-o cardboard Happy Birthday Banner, but I love this idea so much better. I just read your traveling car idea for Thomas, but Annie's birthday is next week, and it would be lovely to have this to use for her birthday dinner (and all day!). I probably have enough scraps for this on my own, except for the felt letters. Of course, if I have to go to W-M for Thomas's car bag, then I could get some more stuff for this, too!
ReplyDeleteI definitely, definitely need to make one of these! Maybe even a personalized one for each of the kiddos each year?
ReplyDeleteWhat an awesome idea, I'm thinking of making one with no letters for the boys just to hang in their room, I think I'll look for checkered flag material..
ReplyDeleteLove the banner, especially the way all the fabrics go perfectly together, despite being so different.
ReplyDeleteLove the banner but man--do I ever hate to sew around curves. Always ends up janky for me. Love love love the font you chose.
ReplyDeleteWhat a sweet idea. I love the thought of putting it up for good grades and such. I will have to make one in time for the end of potty training...won't that be a glorious day.
ReplyDeleteThis is great. It is so simple, and yet it looks so intimidating. Thanks for "spelling" it out so precisely. I love that you just enlarged a computer font to get a pattern. Too easy! and yet my tired brain never would have thought of it...
ReplyDelete